Smart Reader Overview
Smart Reader is an Indian product developed by the team of OMR Home, with help of Smart reader you can read scanned OMR Sheet with in three clicks, for scanning of OMR sheet you can use any normal ADF scanner. Smarter Reader gives you 100% accurate result and export data into Text and Excel formats. Smart Reader is used and trusted by more than 200 customers in India.

EXAMS PATTERN & EVALUATION MODES
Smart Reader strongly supports all pattern used in entrance examination of IIT-JEE, AIEEE, CBSE, CPMT, CPT, CAT etc. you can use Smart Reader for evaluation of Psychometric Test or Surveys.
|
Sample OMR Sheet |
||
|
-CPT
|
|
|
Type of questions
Multiple Choice Questions
Multiple choice questions are a form of assessment in which respondents are asked to select the best possible answer (or answers) out of the choices from a list.
Evaluation Pattern
Single Choice Question - Negative marking is supported.

Multiple Choice Question - If answer is A & B then there can be three possibilities:
- Student can fill C & D = Wrong
- Student can fill A & B = Right
- Student can fill A & C or C & B = in this case student has attempted one correct option so for the corrected part marks can be allotted.
Matrix Questions (Row Matching)
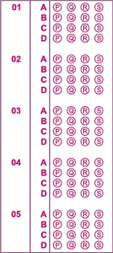
Match Matrix is a new format of questions introduced in IIT-JEE examination. This question have 16 options in the form of P-Q-R-S, this 16 options are divided in 4 parts
Evaluation Pattern:
![]()
Partial marks and total marks for the questions can be given separately.
Numeric Response Questions (Integer value answer);
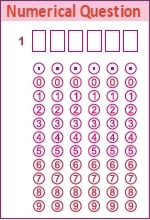
Numerical Question is new format of questions introduced in IIT-JEE examination. In this question student have to fill the value of the answer in bubble format.
Evaluation Pattern:
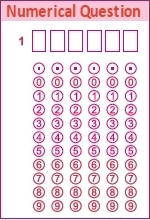
Negative marking is supported.
Key features
- Very easy to use.
- You will get one year support and updates free of cost.
- You can design your own sheet, print it and strat reading.
- You can allot bonus question.
- You can cancel any question.
- Partial marking for questions can be allotted
Other Usefull Software:
Test Analytics
Test Analytics is an added tool that comes with Smart Reader. Test Analytics is for analysis on the various test conducted in your institute, it directly import data from Smart Reader database or it can import data from some other database also.
Other Software use:
Test Analytics – This software can be attach with Smart Reader (OMR Software) for reporting, Test Analytics can produce following reports:
- Test Report
- Test Subject Report
- Column wise Subject Report
- Combined Test Report
- All Student Question wise Report
- Student Question Wise Report
- Individual Test Report
- Individual Test Subject Report
- Percentage Test Report
- Question Percentage Report
- Special Test Report
Question Bank:
Question Bank is unique software developed by Ginger webs to overcome problem faced by the institutions in conducting daily, weekly and monthly test. This software is designed in such a manner that it keeps record in hierarchy of Subject -Units-Chapters-Questions. This software is based on GUI (Graphical User Interface) i.e. a windows based software, which makes it easier to understand and work.
This software is developed, understanding the needs of the customer who do not want to spent time in managing and checking of papers.
Read All Types of OMR Sheet
- You can create your own template as per the OMR form designs.
Support Multiple Answer
- The software accepts multiple answer and allow you assign the negative marking as per the template.
Using OMR Sheet
- HB Pencil and Black point pen can be used to fill the OMR Sheet.
Section wise Score
- You can make various sections in questions like 1-50 Physics, 51-100 Mathematics etc. and get section wise scores.
Compatible with IIT Exam Patterns
- Support Match Matrix type questions used in IIT entrance examinations.
I Card
- You can capture image on the form that can be used for I Card preparations.
Numerical Question
- Support Numerical type questions used in IIT entrance examinations.
Data Export
- The data can be exported into Excel/Text files.
Compatibility
- Software is compatible with ADF scanners.
Template Creation
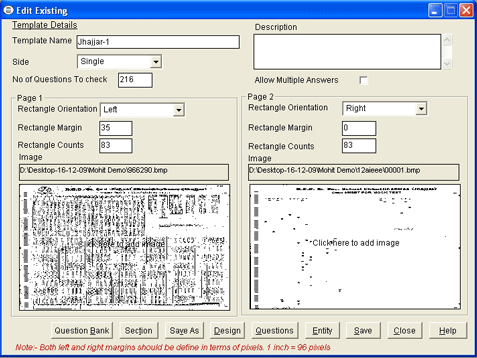
Template Name
Here you have to specify the name you want to give to your template.
Description
Here you can type description for the Template.
Allow multiple answers
You will allow this option if you are having multiple answer in your question paper.
No. of Question to Check
Here you will enter the no. of questions you want to check on your response sheet for example if you want to check only 50 questions on you OMR sheet but your sheet contains 200 questions then you will fill 50 in this option.
PAGE-1
Side – In this option you will specify that the OMR sheet is single side or double side printed.
Rectangle Orientation
In this option you will enter the orientation of Timing Track left/Right/Both.
Rectangle Margin
Here you will enter the distance from the Timing Track to cutting of OMR sheet.
Rectangle Counts
Here you will enter the no. of rectangles you are having in your Timing Track
Click here to add image
Here you will browse and add the front side of the black and white image of OMR sheet.
PAGE-2
You will fill this option if your OMR sheet is double side printed or if it is having Timing Track on both side of the sheet.
**After all this exercise you have to click on save button.
Entity Creation
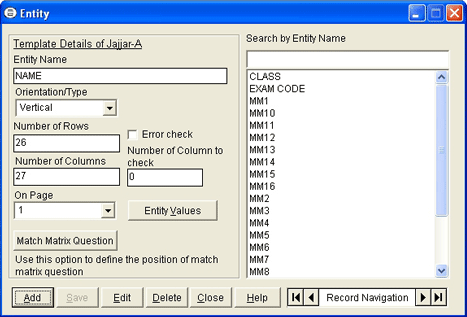
Entity is created for the fields available on OMR sheet for this you have to click on Entity option.
Add
by clicking on Add button you can add a new entity in you Template.
Entity
Here you will specify name of the field for example Candidate Name, Roll No., Date of Birth etc.
Orientation
In this option you will enter the orientation of entity.
No. of Rows
Here you will specify no. of rows in your entity.
No. of Columns
Here you will specify no. of columns in your entity.
On Check
Here you will specify on which side of OMR sheet this entity is placed.
Error Check
In this option you have to specify no. of column you have in your entity if student/candidate fills more or less then the columns mentioned it highlight that portion while reading.
In the end you have to click on save button to save the Entity.
Now you have to specify Entity value by clicking on Entity value button.
Match Matric
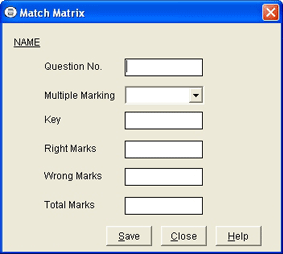
This question will create through Entity option, you have to add an Entity for this and fill all dimensions of it and save it, after this you will click on Match Matrix option and fill it as instruction given below:-
Add
by clicking on Add button you can add a new entity in you Template.
Question No.
In this option you will specify the question no. of this question.
Multiple Marking
In this option you have to choose yes.
Key
Here you will enter the key for ex. PQ-R-S-QR-
Right Marks
here you will specify partial marks to be given if one of the options is right.
Wrong Mask
Here you will give marks should be deducted if one of the option is wrong in question.
Total Mark
Here you will specify the marks if full question is right.
Numerical Question
This question can create through Entity option, you have to add an Entity for this and fill all the dimensions and save it, after this you will click on Match Matrix option and fill it as instruction given below:-
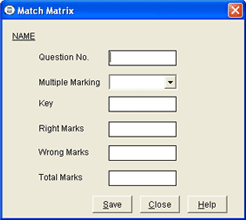
Question No.
In this option you will specify the question no. of this question
Multiple Marking
In this option you have to choose No.
Key
Here you will enter the key for ex. 123.05.
Right Marks
Marks if the question is right.
Wrong Mask
Marks should be deducted if question is wrong.
Total Mark
Marks if the question is right.
Question Entry
This question can create through Entity option, you have to add an Entity for this and fill all the dimensions and save it, after this you will click on Match Matrix option and fill it as instruction given below:-
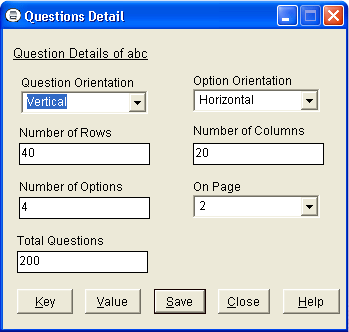
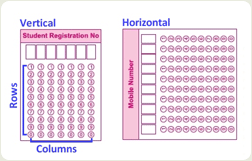
Question Orientation
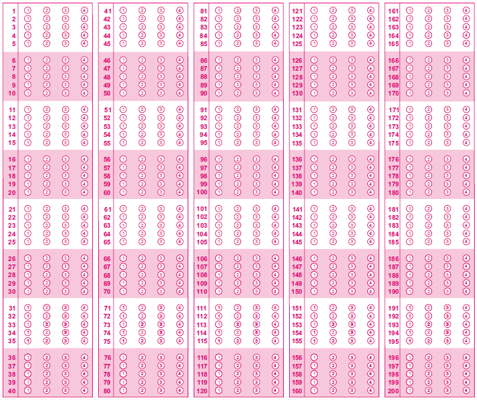
Here you will specify the orientation of the Question for example on the right image you will see the Question orientation is Vertical.
Option Orientation
Here you will specify the orientation of the Options for example on the right image you will see the Option orientation is Horizontal.
Number of Rows
40 (Here you will specify the no. of rows in questions)
Number of Columns
20 (Here you will specify the no. of columns in questions)
Total Questions
200 (Here you will specify no. of questions your OMR sheet having.
Question Option Value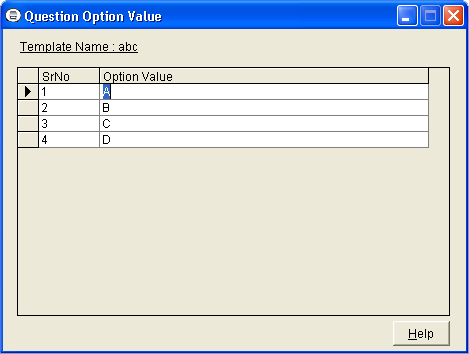
Question Option Value – Here you will enter the value of the options for ex. Your question is having four options A ,B ,C ,D so you will specify 1 = A, 2= B, 3 = C, 4 = D.
Question Key Value
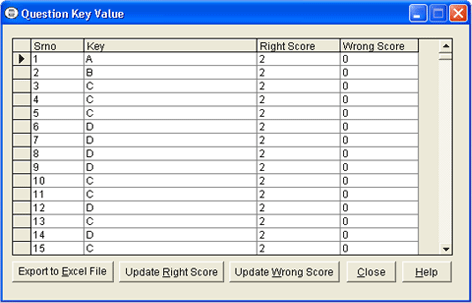
Question Key Value – Here you will specify the answer key of your Question paper if your question paper contain multiple answer then you will right answer with no spacing for if the answer is A and B then you will enter only AB, for single choice you will just type the right answer in front of Srno.
Design of Template
This is the most important part in the software; here you have to design the template, for designing you have to follow the instructions step by step:
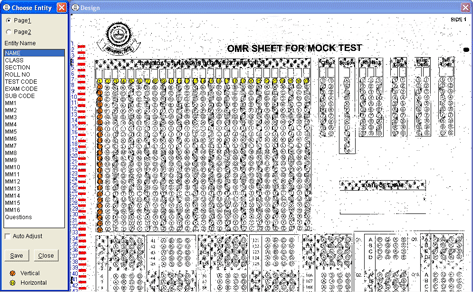
Choose Entity
You will find this box on the left side here you have to choose the page no. and after this you will chose the entity you want to design.
Designing of Entity
Here you have to place all the bubbles on the first row and first column of the entity.
After placing all the bubbles you have to save the entity by clicking on save button.
Like this you have to design all the entities you have created.
Reading of OMR Sheet
You will find this option in menu bar of Data -> Read
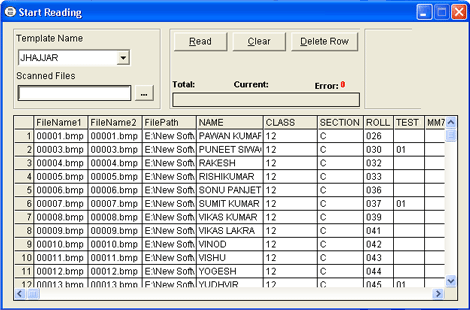
Template Name
Here you have to choose the template name.
Scanned Files
Here you will specify the path of the scanned file.
Read
for reading of scanned file you have to click on the read button.
Clear
if you want to delete previous data from the template you will click on clear button.
Total
Here it will show total no. of scanned filled in the folder.
Current
Here it will show the current no. of scanned file.
Error
Here it will show no. of error files if some sheets are not read properly.
Apply Score
You will find this option in menu bar of Data -> Apply Score
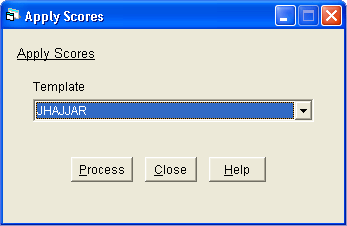
Once you have read all OMR scanned fill then you have to click on apply score button here you will choose your template name and then click on process button for evaluation.
View & Export
You will find this option in menu bar of Data -> View & Export
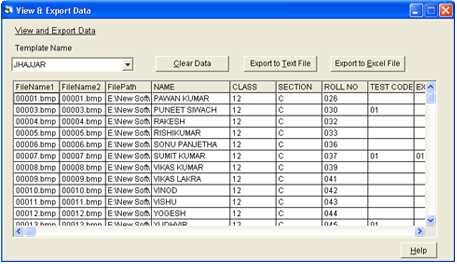
Here you will choose your desire format to export data, you can export data in MS Excel and Text format.


